Computer Vision
The AutoTransformers library can not only be used to extract information from text or documents it can also be used to detect objects in images. In this example, we will how this can be implemented with AutoTransformers and how you can monitor the training process. The overall procedure is described below:
Create the dataset
Implement a custom dataset loader
Train the model using the AutoTransformers library
Babysit the training with ClearML
Predict new samples using the trained AutoTransformer
Dataset
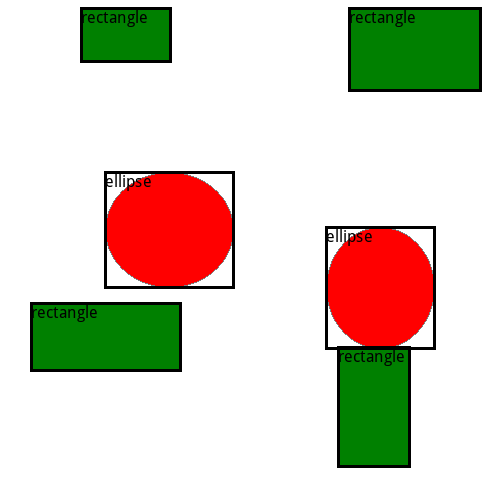
First of all, we want to mention that we create an artificial dataset for this example. In practice, it is possible to detect cars, cats or dogs in images. But in this example, the goal is simply to detect a bounding box and the correct label for rectangles and ellipses. The image and the corresponding bounding boxes are shown below:
The source code to generate those samples is given below
def load_sample(i=0):
    """Generate a random sample with some objects on it."""
    image = Image.new("RGB", (500, 500), color="white")
    draw = ImageDraw.Draw(image)
    labels = []
    bboxes = []

    num_rects = random.randint(1, 4)
    for _ in range(num_rects):
        x1 = random.randint(0, 350)
        y1 = random.randint(0, 350)
        w = random.randint(50, 140)
        h = random.randint(50, 140)
        x2 = x1 + w
        y2 = y1 + h
        draw.rectangle((x1, y1, x1 + w, y1 + h), fill="green", outline=(128, 128, 128))
        labels.append("rectangle")

        x1, y1, x2, y2 = x1 / 500, y1 / 500, x2 / 500, y2 / 500
        bbox = BBox(x1, y1, x2, y1, x2, y2, x1, y2, 500, 500)
        bboxes.append(bbox)

    num_ellips = random.randint(1, 4)
    for _ in range(num_ellips):
        x1 = random.randint(0, 350)
        y1 = random.randint(0, 350)
        w = random.randint(50, 140)
        h = random.randint(50, 140)
        x2 = x1 + w
        y2 = y1 + h
        draw.ellipse((x1, y1, x1 + w, y1 + h), fill="red", outline=(128, 128, 128))
        labels.append("ellipse")

        x1, y1, x2, y2 = x1 / 500, y1 / 500, x2 / 500, y2 / 500
        bbox = BBox(x1, y1, x2, y1, x2, y2, x1, y2, 500, 500)
        bboxes.append(bbox)

    x = IImage(image)
    y = (TObjectDetection(labels, bboxes),)
    return x, y
Note
Bounding boxes must be given in the format [x1, y1, x2, y2] where x1, y1 represents the upper left point and x2, y2 the lower right point. All values must be provided in pixels.
Datasetloader
We have now seen how we can encode a single sample. Next, we want to implement a custom dataset loader in order to load all the training and test samples. For more information on DatasetLoader we refer to this page.
class ImageDatasetLoader:
    """Warning: Usually, many different images are labeled. For this demo, we only use
    one image and duplicate it n times simply to demonstrate the workflow. Please
    also note that the train, test and eval sets are usually not the same.
    """

    def __init__(self) -> None:
        # Extract all classes from the bounding boxes
        # Note: We sort classes to ensure a correct order also for prediction.
        self.classes = ["rectangle", "ellipse"]

        # Create train, eval and test splits.
        self.train_ds = self._create_ds(size=512)
        self.test_ds = self._create_ds(size=64)
        self.eval_ds = self._create_ds(size=64)

    @property
    def meta(self):
        """The meta data of the dataset is stored with the trained model such that we
        can later reproduce the results. Whenever we change the dataset, we should also
        change the version number.
        """
        return DatasetMeta(
            name="ImageExampleDataset", version="1.0.0", created_with="Manual"
        )

    @property
    def config(self):
        return IImage.Config(), (
            TObjectDetection.Config(
                task_id="OBJ",
                classes=self.classes,
            ),
        )

    def _create_ds(self, size):
        return ATDataset(self.config, load_sample, length=size)
Training
Next, we can use the ImageDatasetLoader and the AutoTransformers library to train a model. To improve the performance its best-practice to randomly transform images. Internally, we use the albumentations library to augment images and support all transformations that exist in this framework are also supported by AutoTransformers. Augmentations can be added as shown below:
def get_config(use_clearml):
    """Random data augmentation to improve generalization of the model."""
    return {
        "engine": {
            "stop_condition": {
                "type": "MaxEpochs",
                "value": 10,
            },
            "lr_scheduler": {
                "type": "LinearWithWarmup",
                "num_warmup_steps": 0,
            },
            "modules": {
                "tracking.ClearML": {
                    "enabled": use_clearml,
                },
            },
            "train_augment": [
                {"type": "HorizontalFlip", "p": 0.5},
                {"type": "VerticalFlip", "p": 0.0},
                {"type": "Perspective", "p": 0.25},
                {
                    "type": "PadIfNeeded",
                    "min_width": 320,
                    "min_height": 320,
                    "border_mode": 0,
                },
                {
                    "type": "RandomResizedCrop",
                    "width": 320,
                    "height": 320,
                    "scale": [0.6, 1.0],
                },
                {"type": "Resize", "height": 320, "width": 320},
            ],
            "test_augment": [
                {"type": "LongestMaxSize", "max_size": 320},
                {
                    "type": "PadIfNeeded",
                    "min_width": 320,
                    "min_height": 320,
                    "border_mode": 0,
                },
                {"type": "Resize", "height": 320, "width": 320},
            ],
            "inference_augment": {"img_size": 320},
        }
    }
In this case, we randomly flip all inputs and apply random perspective transformations. Finally, we resize all images to 320x320 px by resizing and (in case it is not square already) adding black borders. Some valid sizes are 320x320, 416x416 or 608x608 (default). Note that smaller images are faster to train, but fewer details are shown to the model which could reduce the performance. More details and transformations are available in the albumentations documentation.
After adding transformations it is important to ensure that augmentations are also valid (e.g. if random brightness is selected too strongly, the image could become unrecognizable). Therefore, it is important to monitor the training process as well as some training images as seen by the model. Everything is already implemented in the AutoTransformers library. We simply need to enable the tracking.ClearML module when we instantiate the `AutoTransformer`` class. The following code snipped finally shows how we can train the model with custom data augmentation and enabled ClearML monitoring:
def train(dl, use_clearml=True):
    """Train an AutoTransformer on the given dataset loader."""
    # Set some very special parameters for the demo.
    config = get_config(use_clearml)

    # Initialize a new AT
    at = AutoTransformer(config)
    at.init(dataset_loader=dl, path=".models/computer_vision/obj_detection")

    # Train model
    metrics = at.train(dl)
    return at, metrics
Note
To be able to use the tracking.ClearML module, you need to have a ClearML account. If you don’t have one, you can create one for free here. Please also install ClearML on your machine by running pip install clearml.
During Training, different metrics (e.g. mAP, mAR etc.) are visualized in ClearML as shown below:
![]()
Additionally, it is possible to visualize the training images as seen by the model. Simply open the “DEBUG SAMPLES” section in ClearML and you will see the following images:
![]()
Prediction
Finally, we can use the trained model to predict new samples. The following code snippet shows how we can load a trained model and predict new samples:
def predict(at):
    # Finally, predict new images. The input can be of type
    # IImage, a path to an image or a PIL image too.
    new_img = load_sample()[0]
    pred = at(new_img)
    draw_predictions(pred)
Full source code
Source Code
from PIL import Image, ImageDraw
import random

from autotransformers import AutoTransformer, init_logging
from autotransformers.dataset_loader import DatasetMeta, ATDataset
from autotransformers.utils import cv_utils
from autotransformers.types import IImage
from autotransformers.domains.computer_vision.types import TObjectDetection
from autotransformers.utils.bbox_utils import BBox


def load_sample(i=0):
    """Generate a random sample with some objects on it."""
    image = Image.new("RGB", (500, 500), color="white")
    draw = ImageDraw.Draw(image)
    labels = []
    bboxes = []

    num_rects = random.randint(1, 4)
    for _ in range(num_rects):
        x1 = random.randint(0, 350)
        y1 = random.randint(0, 350)
        w = random.randint(50, 140)
        h = random.randint(50, 140)
        x2 = x1 + w
        y2 = y1 + h
        draw.rectangle((x1, y1, x1 + w, y1 + h), fill="green", outline=(128, 128, 128))
        labels.append("rectangle")

        x1, y1, x2, y2 = x1 / 500, y1 / 500, x2 / 500, y2 / 500
        bbox = BBox(x1, y1, x2, y1, x2, y2, x1, y2, 500, 500)
        bboxes.append(bbox)

    num_ellips = random.randint(1, 4)
    for _ in range(num_ellips):
        x1 = random.randint(0, 350)
        y1 = random.randint(0, 350)
        w = random.randint(50, 140)
        h = random.randint(50, 140)
        x2 = x1 + w
        y2 = y1 + h
        draw.ellipse((x1, y1, x1 + w, y1 + h), fill="red", outline=(128, 128, 128))
        labels.append("ellipse")

        x1, y1, x2, y2 = x1 / 500, y1 / 500, x2 / 500, y2 / 500
        bbox = BBox(x1, y1, x2, y1, x2, y2, x1, y2, 500, 500)
        bboxes.append(bbox)

    x = IImage(image)
    y = (TObjectDetection(labels, bboxes),)
    return x, y


class ImageDatasetLoader:
    """Warning: Usually, many different images are labeled. For this demo, we only use
    one image and duplicate it n times simply to demonstrate the workflow. Please
    also note that the train, test and eval sets are usually not the same.
    """

    def __init__(self) -> None:
        # Extract all classes from the bounding boxes
        # Note: We sort classes to ensure a correct order also for prediction.
        self.classes = ["rectangle", "ellipse"]

        # Create train, eval and test splits.
        self.train_ds = self._create_ds(size=512)
        self.test_ds = self._create_ds(size=64)
        self.eval_ds = self._create_ds(size=64)

    @property
    def meta(self):
        """The meta data of the dataset is stored with the trained model such that we
        can later reproduce the results. Whenever we change the dataset, we should also
        change the version number.
        """
        return DatasetMeta(
            name="ImageExampleDataset", version="1.0.0", created_with="Manual"
        )

    @property
    def config(self):
        return IImage.Config(), (
            TObjectDetection.Config(
                task_id="OBJ",
                classes=self.classes,
            ),
        )

    def _create_ds(self, size):
        return ATDataset(self.config, load_sample, length=size)


def get_config(use_clearml):
    """Random data augmentation to improve generalization of the model."""
    return {
        "engine": {
            "stop_condition": {
                "type": "MaxEpochs",
                "value": 10,
            },
            "lr_scheduler": {
                "type": "LinearWithWarmup",
                "num_warmup_steps": 0,
            },
            "modules": {
                "tracking.ClearML": {
                    "enabled": use_clearml,
                },
            },
            "train_augment": [
                {"type": "HorizontalFlip", "p": 0.5},
                {"type": "VerticalFlip", "p": 0.0},
                {"type": "Perspective", "p": 0.25},
                {
                    "type": "PadIfNeeded",
                    "min_width": 320,
                    "min_height": 320,
                    "border_mode": 0,
                },
                {
                    "type": "RandomResizedCrop",
                    "width": 320,
                    "height": 320,
                    "scale": [0.6, 1.0],
                },
                {"type": "Resize", "height": 320, "width": 320},
            ],
            "test_augment": [
                {"type": "LongestMaxSize", "max_size": 320},
                {
                    "type": "PadIfNeeded",
                    "min_width": 320,
                    "min_height": 320,
                    "border_mode": 0,
                },
                {"type": "Resize", "height": 320, "width": 320},
            ],
            "inference_augment": {"img_size": 320},
        }
    }


def train(dl, use_clearml=True):
    """Train an AutoTransformer on the given dataset loader."""
    # Set some very special parameters for the demo.
    config = get_config(use_clearml)

    # Initialize a new AT
    at = AutoTransformer(config)
    at.init(dataset_loader=dl, path=".models/computer_vision/obj_detection")

    # Train model
    metrics = at.train(dl)
    return at, metrics


def draw_predictions(pred):
    """Draw the predictions on the image."""
    image = cv_utils.draw_bboxes(
        pred[0].image, bboxes=pred[1].bboxes, labels=pred[1].value, color="black"
    )
    image.save("prediction.png")


def predict(at):
    # Finally, predict new images. The input can be of type
    # IImage, a path to an image or a PIL image too.
    new_img = load_sample()[0]
    pred = at(new_img)
    draw_predictions(pred)


def main():
    init_logging()

    dl = ImageDatasetLoader()
    at, metrics = train(dl)

    print(metrics)
    predict(at)


if __name__ == "__main__":
    main()